
A Vendor’s Guide to Renaissance Fairs Part 2: Booth Design
Hello, faire friend! If you’re reading this, then two things must be true: 1) you are a vendor who wants to sell your goods at renaissance fairs, and 2) you need a little help with your applications, your booth, product planning, and more. I’m happy to help!
In case you’d like to know more about me first - my name is Sara and I’m a leathercrafter who has been selling at local renaissance fairs in the northeast Georgia and South Carolina area since 2019. I literally picked the worst possible time to try to start a business, but it still worked out! In this series, I want to dive into my experiences as a renaissance fair vendor. Topics will include:
Booth design (this post)
Costumes
This post is gong to go over booth design, specifically two major elements: renaissance fair specific requirements and expectations, which, yes, are different things. Let’s get started!

Requirements
When it comes to requirements, each event is going to be different, but overall they will always require your booth to be “in theme.” What that means can vary from event to event and also from vendor to vendor depending on your wares, what kind of tent you have, your branding, etc.
For the purpose of this series, I’m going to assume you have all of your branding nailed down and you know basic things like what your colors are, textures that fit your brand, and what kind of general vibe you want your booth to give off.
While there are a lot of events that require a white canopy, renaissance fairs don’t care. Rather than requiring everyone to be in a white 10x10 canopy from ABC Canopy, they will prefer your canopy be decorated in a renaissance fair theme. This means that IF they will allow that 10x10 canopy, no modern logos can be visible (from the canopy company or your own business), and may also mean a canopy cover, such as from Covering Up Historically. This is generally the case for single-day or single-weekend events.
Alternatively, more strict events such as the ones with a permanent location will generally require something more historically accurate than a 10x10 with a cover. You may need to get yourself something like a medieval-style market tent or pavilion, such as from Tent Smiths. Very large fairs, such as the Georgia Renaissance Fair that is closest to me, only allows tents on a case-by-case basis last I checked, and those are pretty much never a 10x10 ABC Canopy setup.
For the last several years, since I have done exclusively small events, I have been working with my standard 10x10 or 10x20 canopy frame and the standard cover that has come with them. I also added several curtains in burgundy and gold and added some valances I found on Amazon. Most recently, I upgraded my 10x10 canopy color to burgundy, which really helps the valances pop and pulls everything together. I would have loved a gold canopy, but unfortunately that’s not a color that any canopy makers provide. My end goal for my 10x10 and 10x20 ABC Canopy tops will be for the burgundy covers to eventually have the sun from my logo painted onto them in a manner similar to medieval tents and pavilions.
The curtains also do double duty as weight covers because, while plenty of events will be able to allow staking, not every event can or will, so you will need to find a way to hide your weights. I personally use Home Depot buckets full of concrete with eye bolts in the top for my ratchet straps, and those work exceptionally well for me as weights. The curtains then drape around the buckets and I can pin the curtains closed to hide the buckets completely.
For inside your booth, renaissance fairs will also require that your more modern items are hidden. What that may mean is that any ice chests are put underneath tables or have a cover to disguise them, chairs are in theme, and boxes and carts are hidden away or returned to your car before the event begins. This may seem unnecessary, but it helps with immersing the customers in the event, and it really can make a difference in how your booth is perceived.
Again, specific requirements will vary from event to event, so be sure to check your application or acceptance information so you know what you’ll need to prepare for.
This was my 10×20 booth from the Upstate Renaissance Festival the first year I attended. This has been my primary layout ever since.
Recommendations
I’m going to break this up into sections because as far as recommendations go, I have many…
For your canopy cover
If you have a 10x10 or 10x20 canopy like I do, there are plenty of different things you can do. I would recommend one of two options.
Option 1: Do like I do and use the standard canopy cover, but add details like curtains and valances. Make sure the canopy cover, curtains, valances, etc. are all in coordinating colors and lend themselves well towards your branding. Choosing curtains with more of a visible texture, like a natural linen, will also lend to the vibe more than a polyester fabric or the standard practically plastic canopy walls will.
Option 2: Depending on your branding, you may want to purchase a special-made canopy cover from a company like Covering Up Historically, or from HippieWild on Etsy. I’ve seen other vendors use their covers in the past and they both look great and lend well to the vibe. While I don’t have one of these myself, it’s my understanding from other vendors that you will still need your standard canopy cover underneath these, especially if rain is in the forecast.
One thing that I plan on testing but that I haven’t seen anyone else in my area do before is paint their canopies. Medieval tents used to be painted with numerous designs, and one idea I had that I’d like to try out is painting the sun portion of my logo onto the top of my canopy in gold to bring the whole thing together. Once I do end up doing that, I will be writing a whole blog post on my experience there because it seems like there isn’t any information out there on this subject (which may be an indicator of my future success levels, but hey, I’ll still give it a try).
Booth Walls
One thing you may want to consider is “walls,” whether that is in the form of actual walls or just something to create a perceived boundary between yourself and your neighbor. This will, of course, also vary depending on how your booth is laid out. A vendor whose booth is designed for customers to come inside would benefit more from this than a vendor whose booth is designed for customers to shop it from outside the tent.
I have seen vendors use a variety of things, from the actual canopy walls sold by canopy makers to tapestries, greenery, and even leather hides. One of my favorite things to use is mesh canopy curtains like the ones used to keep bugs out. I prefer these because they really help with allowing a breeze through, which I have found through experience to be a good bit better for stability’s sake. I also quite like the mesh curtains specifically as they are designed so they can be unzipped and opened during the day, then zipped closed at night, and that works quite well for multi-day events as it very clearly gives off that we are closed for business.
One note on the mesh walls: If you do decide to go down this route, I would also recommend investing in some clear shower curtains. You can get them from Walmart super cheap and they’re great to put up behind grid walls if you use them to keep your products dry in the rain or to cover tables at night if you do multi-day events.
If your branding lends itself well toward greenery, there are also expanding walls of greenery and vines, and I’ve seen people use those as walls for their booths as well. I’ve also seen people who have used those wall coverings that Home Depot sells, like the fake brick walls, and they use those on their booths, too. Really, it all depends on your booth’s branding and how creative you can be! (And how much space you have in your car… that too…)
Personally I prefer shopping at booths that have some sort of wall or separation put up. To me, it presents a more professional appearance by defining the space and making it feel more like someone’s little shop. It also helps break up the “craft fair” aesthetic that a solid color 10x10 canopy with a few tables along the front gives off. That’s not to say that booths without “walls” are less professional, because if your branding is strong you may not need it, but I do think every booth can benefit from them, especially if there’s a chance of rain.
Decorations
When it comes to decorations, in my experience, use them sparingly and be intentional with what you choose. When I first began, I had a number of additional decorations that I thought looked cool and added to the vibe, but people kept asking me if the items were for sale. I still have that happen regularly with the clothes that I put on my mannequins, but I like to think that’s because I accessorize them with my products well.
I would also advise using decorations intentionally. If they don’t serve a purpose, such as my giant light up mushrooms helping to add some light to night events, then they probably don’t need to be there. Not only does this discourage people from trying to buy them off of you (I’ll keep my mushies, thanks), but it will also help make tear down that much quicker and easier if your booth isn’t as cluttered.
One thing to note specifically for greenery - how badly do you want to use it? The reason I ask is because my brand colors were originally green and brown. My favorite color is green, so I thought it was an obvious choice… until I attended several events and every third booth was green and also used the same fake vines from Amazon to decorate with. At that point, I decided that I wanted my products to stand out more, so I chose a color scheme that was almost the opposite of green and I do feel like that helps me stand out quite a bit in comparison.
As far as my booth goes, I limit my decorations to just a few things: flameless LED candles, leather hides used as table coverings on top of my full-length table cloths, a mirror for my display of hats, and a pretty set of gold bells that I hang on the front of my booth. For night events, I’ll add my red and gold light up mushies alongside my usual lights to add to the aesthetic.
Apparently, this is the best shot I have of my mannequin. Need to fix that…
Out-of-booth decorations
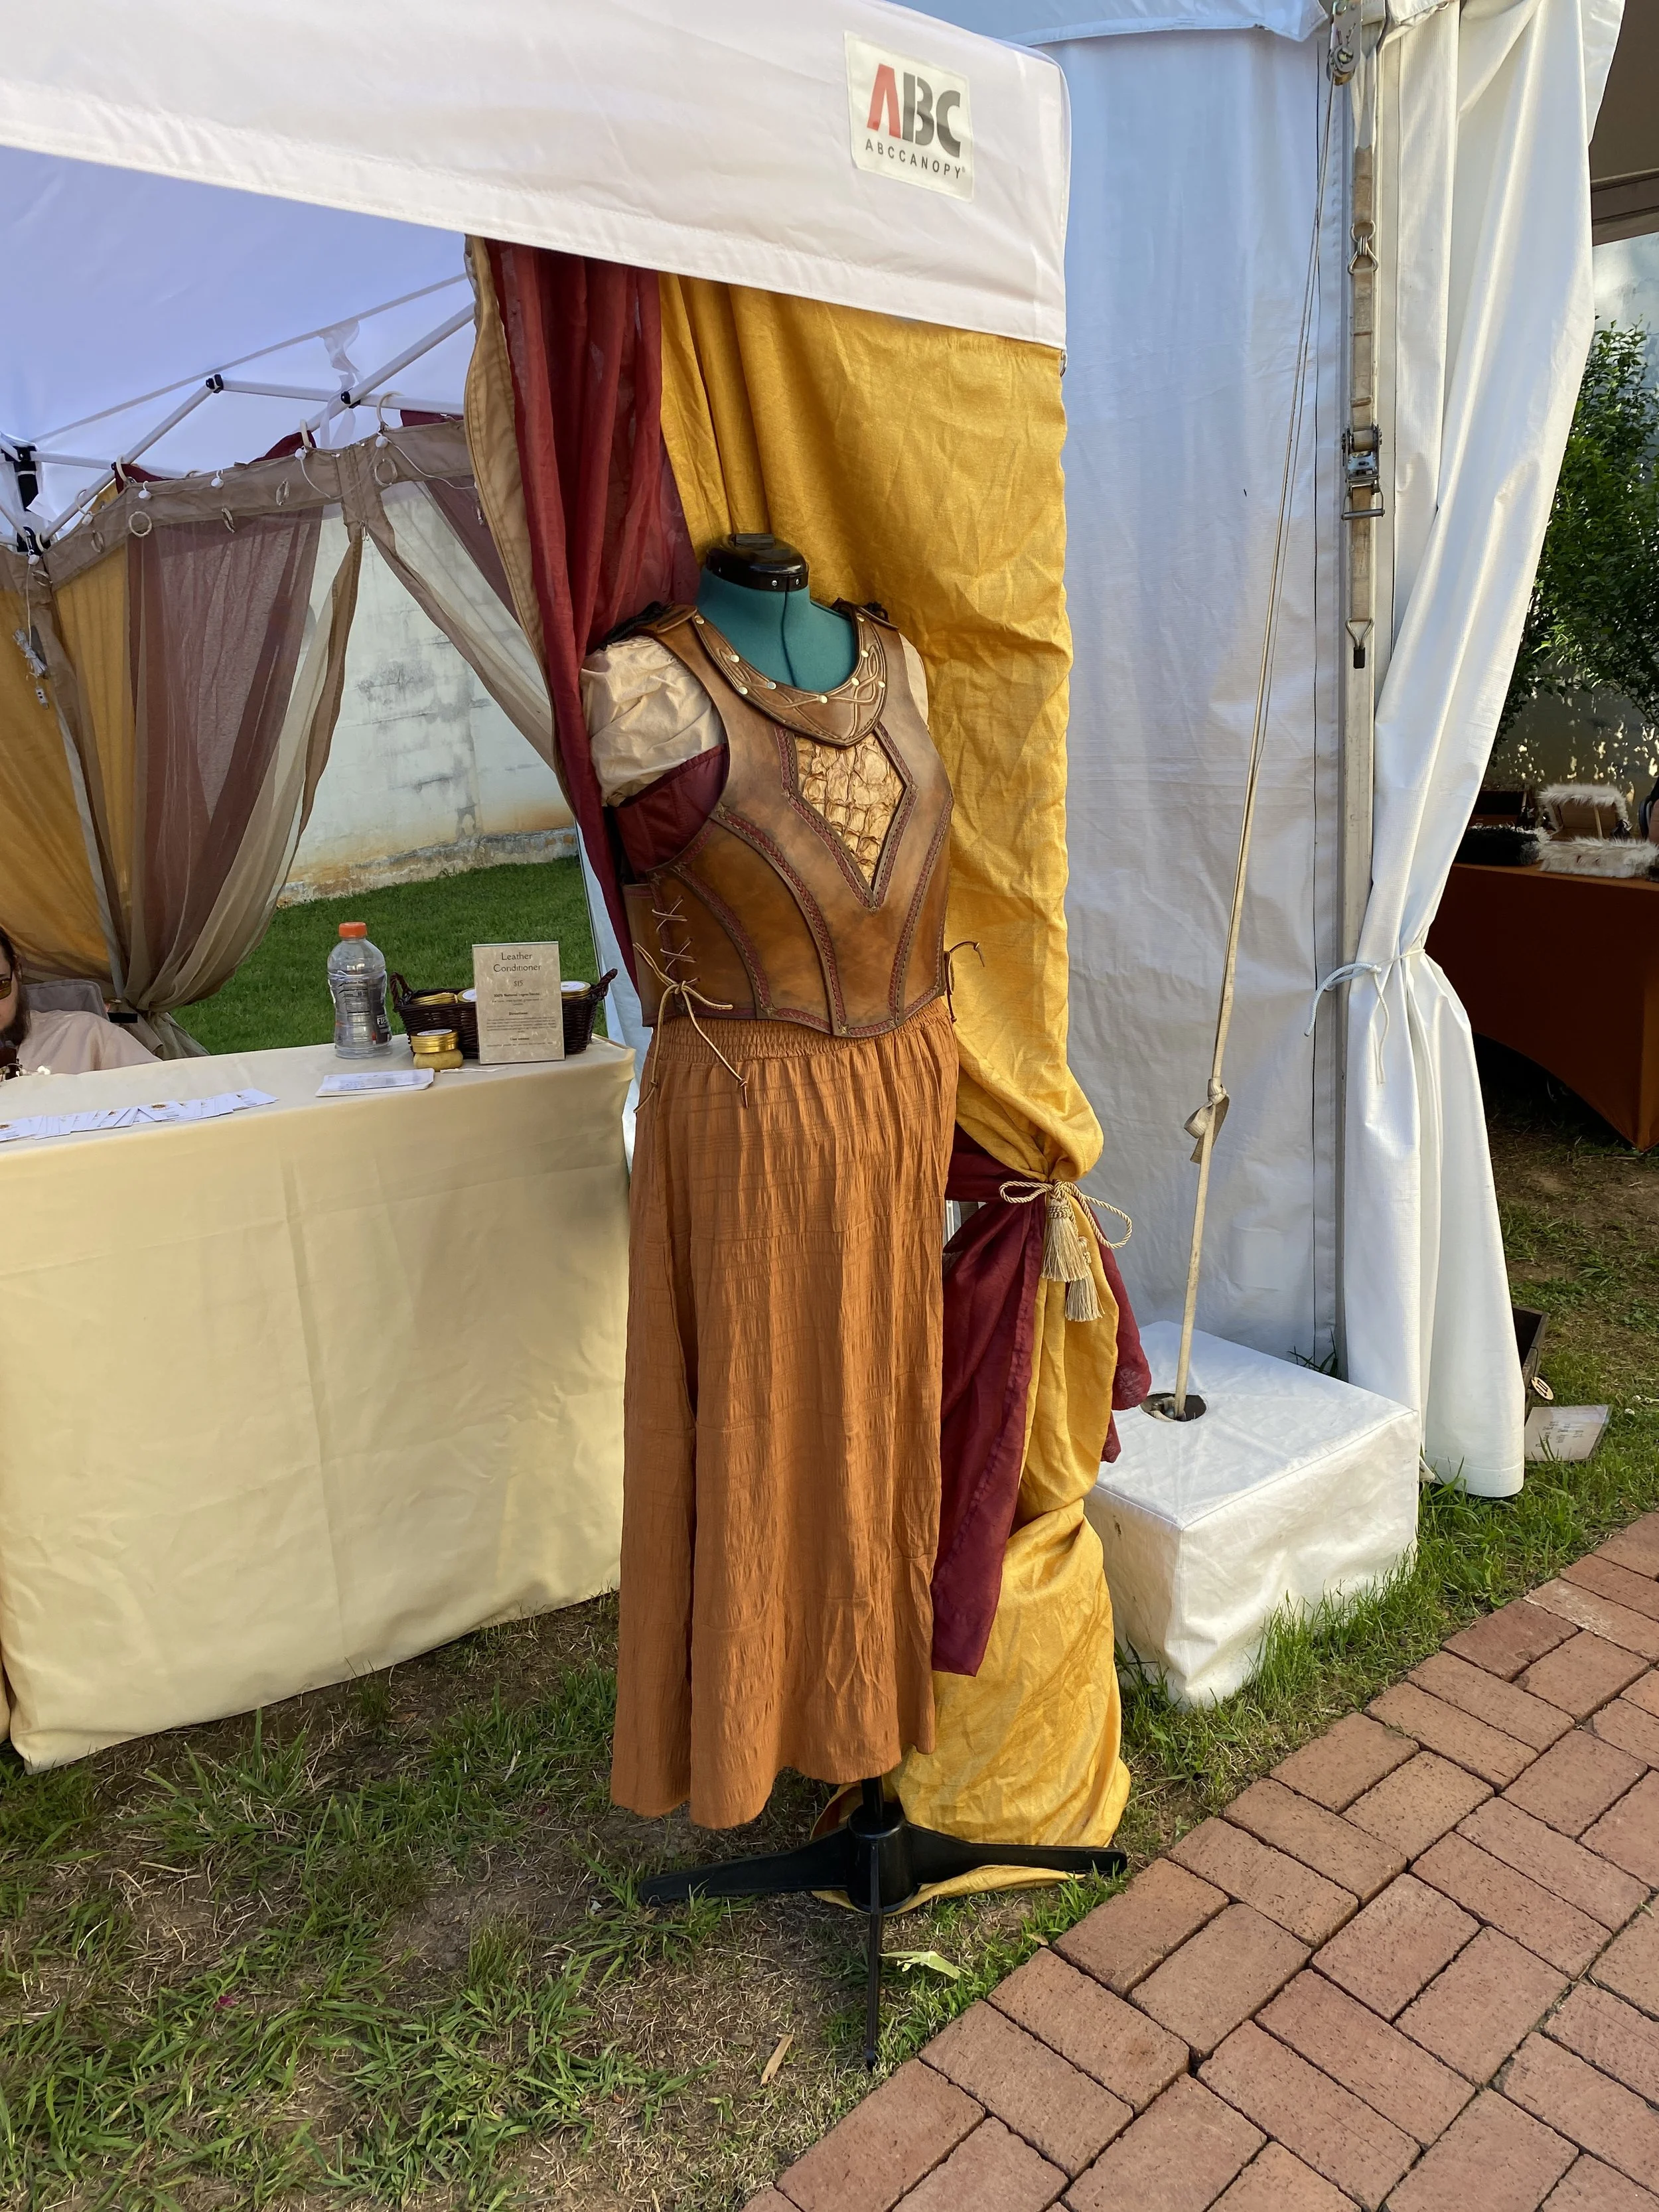
When it comes to renaissance fairs, they are also generally more lenient on people whose displays expand outside of their booths. Now, I’m not saying to blow way out of your assigned space, but if you have a small display just outside to draw people in, that can also be beneficial. I have a mannequin that I bring to every show that either wears several small accessories, or she dons a set of armor. Either way, she is wearing something I make that is more of a statement piece that draws customers in.
I’ve seen other vendors put things like small shelves, hat racks, and trunks with smaller items in them just outside their booths as a way to catch the eye and draw customers in. There is the possibility of theft to consider, so it may not be the best idea depending on your products, but if it’s something you’re able to do and feel comfortable doing, I would recommend it. It’s much easier for someone to run off with a pair of earrings than a whole mannequin!
This next tidbit doesn’t just apply to renaissance fairs, but also to other themed events like fairy festivals, pirate festivals, etc. If you can add a small prop outside your booth, that can also benefit you. One year I attended a pirate-themed event and I pinned a giant stuffed octopus to the top of my canopy so it looked like he was crawling up to the top, then had a little Halloween skeleton sitting propped against one leg of my canopy wearing a sign that said “We take carrrrds.”
Floor coverings
As far as floor coverings go, I personally feel like this is a hard no, and for numerous reasons. People are going to be walking all over it, so if it’s a muddy, rainy day, bringing a rug is just a bad idea all around. There’s also the risk that someone spills something on it and then you have to clean it up even if it’s a nice, dry day. Rugs will take up a LOT of unnecessary room in your car. It’s possible that having a rug can cover up an uneven part of the ground, which could lead to a customer tripping inside your booth, possibly hurting themselves, your display, and/or your products.
And most importantly, it’s a huge liability. If a customer trips on something like an exposed rock or root but you don’t cover it up, then the liability is more likely to be on the venue owner. If you do, then there’s a possibility that the liability becomes yours. I say this because my mother-in-law is an insurance agent and almost stroked out when I first mentioned wanting a pretty red and gold rug for my booth.
“But Sara, the vibes!”
No. Don’t do it. It’s not worth the risk. There are plenty of other elements you can focus on that won’t put you at such a risk.
Table cloths
If you’re using plastic folding tables, you will need table cloths. I would recommend getting floor-length table cloths that aren’t the fitted variety. Fitted table cloths are fine for modern events like fall festivals and craft fairs, but they are, in my opinion, too modern for a renaissance fair. I’d recommend sticking with looser fitting table cloths. I would also recommend not using anything that has a huge logo or something that’s obviously screen printed like a table runner from Vista Print. Again, just too modern.
For my booth, I use these table cloths from Amazon along with several rolls of less-than-great quality leather that I wouldn’t make any products out of, but they look great rolled out on my table as a touch of texture. Depending on your branding, you may be able to use any number of things as table decoration, but it’s never a bad idea to have a basic table cloth as the main covering.
Signage
When it comes to signs, there are three different types of signage you should consider: your main sign with your booth name and logo, price signs, and important information signs.
I do recommend having some kind of sign with your booth name so customers know who they are shopping with, however I will caution you to make sure this is in theme. A vinyl banner may work for some events, but likely won’t be acceptable for all events. For my booth, I have a coworker at my day job who is also into renaissance fairs. He offered to trade me a hand-carved sign with my name and logo for a custom pirate hat, which I could not say no to. I decided to stain my sign using a Black Cherry colored stain, then I painted the carved letters white and the logo portion gold. I’m still working on a method to hang this outside my booth, but once I’m able to hang it, I know it’ll be a showstopper for me.
For price signs, this is going to depend more on what you sell as not every type of product will benefit from a menu sign with prices. And, even if you use them, it’s only a 50/50 bet customers will read them. Whatever you do though, consider trying to keep it in theme. I use super cheap acrylic signs that I think are actually meant for photos, but they work well for me. I print out my prices on paper that looks like old scrolls so the signs themselves aren’t too jarring. (I don’t tend to like acrylic on principle, and especially not at renaissance fairs.)
Depending on your booth, you may also want additional information signs. This will also depend on what you sell. My blacksmith friend has some liability signs they hang up, like “Must be 18 years or older to purchase.” I’ve hung up the “We take carrrrds” sign, and I think taking cards and having a variation of that is a must for anybody anyway. Lots of people now have signs with QR codes to their various payment methods, and that may also be something you’ll want to renn-ify.
Lighting
This won’t be necessary for everyone or for every event, but it is something to consider if you use a darker canopy with walls or if you attend any events held near or after dark. I’ve attended a few different nighttime events now, and lighting inside your booth is so very important, even if you’re somewhere where there is ample lighting in the lanes where customers are walking. I have tried several different lighting options but I’ve found the most success with this set of outdoor lights. There are 30 bulbs on a 60ft string, which is enough to go around the entirety of my 10x20 canopy and light it up quite well.
I wouldn’t recommend fairy lights or string lights with small bulbs because the ones I’ve tried, I didn’t feel like they lit up my booth very well. You can also add in some accent lighting. I always have LED flameless candles that I use no matter the event, and for night events I bring my light up mushrooms.
Product Displays

In this shot, you can see the cream-colored table cloths I use as my base. I have various levels I use for display, from the trunk on the ground to the crates, hat stand, and basket on the table to the grid wall on the left of the table. There’s also added texture in the leather hides. I’m always improving, but every event I attend I get compliments on my setup.
This is the most fun part, which is why I wanted to leave it to the end. Displaying your products is the best part of designing your booth because that dictates how customers will perceive your products. Now, there’s a LOT of content out there with ideas on how to display various types of products, so I’m not going to go too in depth with specifics. There are also quite a few major different types of displays that you can use, such as tables, shelves, or grid walls that can be modified to fit many different kinds of booths. So for the purpose of this post, I only want to give you a few things to consider. Those are color, texture, and height.
Color-wise, I would recommend something that is more on the neutral side, still maintaining your branding, but not too much so it doesn’t overpower your products. When I was still doing green for my brand colors, I had green table cloths and a green canopy (greenhouse, anyone?), so I used full size leather hides in black and brown on my tables to break up the green and tie the aesthetic together more. I don’t use green as my base anymore, instead using more of a creamy beige/champagne color, but I still use several hides in various shades of light to mid-tone browns. I also have all of the wood elements of my booth coordinating in a dark reddish-brown color. I do use those milk crates that everyone uses, but honestly they’re just so convenient, I can’t justify not using them.
For texture, you can add texture in so many ways, but I personally prefer using baskets since it fits best with my branding. I love using thrifted baskets to hold arrangements of smaller things like my shoelace charms. With my baskets, I try to choose light beige colors so the baskets contrast against the darker leathers but still go along with the creamy colored table cloths. What texture looks like for others may be adding tassels to your table cloths, fake vines weaving throughout your product displays and along the bars of your canopy, or any number of other things. Just no rugs, okay?
Height is the most important one of these in my mind. There’s a limit to how much stuff you can put on a table, especially if you’re sitting behind that table. But, if you can stack your crates, add a riser underneath a display, or even hang grid walls from your canopy frame, you can really expand your usable space. Not only do you get the benefit of more space to display products, but also the benefit of giving your customer more to look at, thus keeping them in your booth longer. We’re all pretty used to walking past a table, seeing what’s on the table, going “eh, not for me” and then walking right on by. But, I’ve found that adding height forces people to stop, or at least slow down, so they can take it all in.
Ways I add height include the crates, risers, and grid walls I’ve already mentioned, but I also have this absolutely perfect double-decker basket I put my adventure pals in, and the basket itself is enough to draw people in. For my hats, I have hat stands that I’ll put them on, on top of the stacked crates, so that the hats are right at eye level. Lastly, and my favorite way to add height, is adding shorter items in front of my table too. Adding height isn’t just limited to height on top of your table. It can be height in front of it too! I’ve found that having my items displayed neatly on top of vintage trunks also brings people in to see what they are.
Recap
Ultimately, what all of this boils down to is visual interest. You want your booth to be interesting. You want your booth to be able to draw customers in from a distance, like a window display at the mall. If all of the elements of your booth are well put together, neat, organized, and all of the pieces work with one another, you’ve got a beautiful backdrop for your amazing products.
When I first started designing my booth after I decided to get away from green and vines, I didn’t think of it like a booth. I thought of it as my own personal store, even though it wouldn’t be in a permanent location. I had worked for a few years in retail and while I wasn’t on the merchandising team, I did get to work with them from time to time and I learned a good bit about merchandising and displaying products. I also did quite a bit of research when I was designing my booth, from reading blogs to watching YouTube videos and even browsing store supply companies to see what kind of things were out there.
It will likely take some time, and if you have to invest in key pieces one at a time, that’s okay. I feel like my booth is constantly evolving, and I have plans that I still have yet to execute, like the sun painted on my canopy and having a sign with my booth name and logo on it displayed outside my booth. Building your dream booth will take time, but keep working at it. The time will pass anyway.